Crown molding is the piece of wood that sits in between the corners of the wall and ceiling at about 45-degree angle. The moldings can be at the bottom or the top of the corners. Cutting the moldings is not tricky, but could be if the walls are not exactly square in shape.
Tip: If you wish to paint the edges, use acrylic latex caulk to fill up the imperfect gaps.
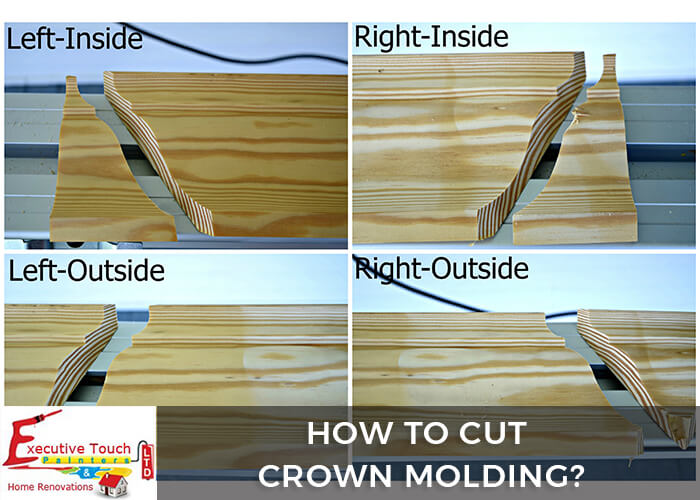
Use a Protractor to measure the exact angle of the edge. Most precisely the angle would be 90-degree, must measure the correct angle. Make sure that the protractor is placed parallel to the bottom and ceiling, to get the right angle. Cut each of the two crown molding pieces at half of the measured angle to make them fit precisely in the corner.
Set the compound miter saw to the required angle. Place the piece to be cut on the bed of the saw and cut while you held the mold with your left hand. Be sure that the bottom of the molding should be up when you make the cutting. Do not turn the saw while cutting, as it might change the angle.
Now set the angle again on the miter and make the cutting of the left corner. Place the molding on the bed of the saw and while you held the mold with the right hand, make the cut. Here also the bottom of the molding should be kept up while cutting and also the saw should not be turned while cutting.
Warning: Take precautionary measures when working on the miter and saw.
Marking is the crucial step to be done carefully. Measure the length of the crown needed for the outside corners of the walls. Using a tape, measure the dimensions of the outer edge where the molding is to be fitted. Mark the lengths clearly with a pencil.
Using a large protractor measure the angle between the outside corners. Note down both outer angles from each corner of the wall.
A miter saw is a device needed now. The miter saw is used to cut the crown mouldings at the particular angle that is required. Set the required angle in the miter saw and cut one of the moldings. Pick up the second molding piece and perform the cutting by placing it upside down on the saw. Pick up the two pieces and check if they fit on the outside corner perfectly. Usually, the angle for cutting the moldings is 45 degrees.
Now that you came to know about how to cut crown molding, follow the next step of installing crown molding here.
The above-mentioned instructions on how to cut crown molding will be helpful if you had some previous experience in using the sharp tools, else it is a wise decision to get your job done by a professional because a single mistake made in the process can create a whole mess and will result in the loss of material, money and of course your valuable time. Our Professionals at Executive Touch Painters and Home Renovations Ltd has got years of experience in various custom carpentry and trim work for residential and commercial spaces in Toronto. Contact or Call us at 416-410-0164 for a Free Estimate Now!